Oven stability

AysunM

New Member
Joined
Dec 18, 2021
Posts
3
For the last year my oven (in my 2013 2720) keeps trying to fall out of where it is affixed in the counter/cabinet section of the kitchen.

I have had it screwed back in place twice and both times it nearly falls again during the next trip.
I live in it most of the year and don't want to not have an oven, but I can't decide if the issue is the oven or the area it is in.

Has anyone had a similar experience in their trailer?

- Carly
 
My oven has stayed in place. Are you reusing the original holes? You could drill new holes and maybe add a tiny bit of wood glue to keep the screws from backing out. My camper is closed, but from some of my pics, there looks to be screws on the front, just behind the door. I'm assuming it's a part of the trim. I'd add a couple new on both sides of the front, then pop the range top up and add more screws along the outer edge. You should be able to see the screws along the top part of the oven and the back wall brackets.
 

Attachments

  • TM stove top.JPG
    TM stove top.JPG
    1.8 MB · Views: 242
I removed my oven,

:eek: but before I did that I had a similar problem from my inspection of the area.

I ended up attaching new screws to the back wall in the L brackets and using
gorilla glue to strengthen the grip of the screws.

I also drilled holes and added a couple of SS rivets to the area where the
oven affixes to the L brackets.

Those held good until I decided it was time to convert that space to storage.

:)
 
I can see using rivets, but using gorilla glue is a bit much in this case. You want to be able to get the screws out when needed. Adding extra screws along the sides and extra to the L brackets will help and may be enough to fix the problem.
 
I had this problem with all three of my TMs. After messing around with several unsuccessful fixes, I identified a number of poor design elements in the oven, the cooktop, the countertop, and the left wall of the TM kitchen cabinet that holds it all. I decided that the needed solution was to support the weight of the oven on the floor, rather than the countertop. By bringing their weight down to the floor, it takes the strain off the countertop, the cabinet left wall, and the metal support strips that are part of the cooktop. The project turned out to be easier than I thought. The picture shows my finished solution on the right hand side of the cabinetry under the oven - it was repeated on the left side.

I made two side rails by cutting pieces of 1x2 board to fit front-to-back, between the aluminum inner wall of the TM and the inside of the door frame. This rail is not screwed to the TM wall or the door frame. Instead, I put screws through the thin sidewall of the cabinet, into an existing front-to-back rail on the other side of the cabinet wall. This piece already had vertical pieces that carried the weight down to the floor, so no further structure was needed.

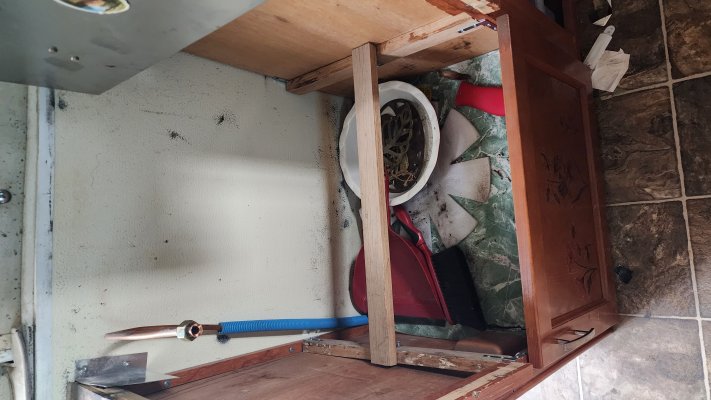
I put in the other side rail on the left wall of the cabinet. I had to add a vertical piece below it to carry the weight down to the floor.

Once the left and right side rails were in place, I added a cross-rail on top of them, below the oven, and fastened the ends in place with steel L-brackets. Finally, I lifted the oven until the edge of the cooktop's support strips were about 1/16" above the countertop. Then I inserted glue-coated wooden shims under the oven near the ends of the cross rail. Once the glue dries, the weight of the oven is carried on the shims.

The whole thing has held up well. It eliminated the pulled screws in the edge of the MDF countertops, and the distortion of the original sheet metal hanger strips on the sides of the cooktop.

If more info would help, feel free to PM me with questions. Remember that the final goal is to take the weight of the oven assembly off the countertops, and carry it straight down to the floor. TM's cabinet construction details have varied a little over the years, so you may need to vary your support pieces to meet the goal.

Bill
 

Attachments

  • Oven right.jpg
    Oven right.jpg
    174.2 KB · Views: 245
Last edited:
I also had problems with my oven coming lose until I did the fix described in post #18 of this thread:
https://www.trailmanorowners.com/forum/showthread.php?t=10246&highlight=oven&page=2

Dave

Dave -

You did real nice job with that, and I'm glad it worked.

The problem I found was that the oven was so heavy that it caused the wimpy sheet metal support L-rails, running front-to-back on each side of the cooktop, to bend upward slightly. The oven sank down slightly, which caused the left wall of the cabinet to splay outward just a little. The support rails, now partially off the countertop, bent upward some more. This sequence continued, wedging the left wall further out and letting the oven drop further down. The screws that go sideways into the edge of the countertops should have kept the walls from spreading, but once the oven started to sink, it pulled the screws a bit crooked in their holes. Particle board won't hold angled screws, so they pulled out. And the whole thing let go.

My solution described above was to take the oven weight off the support rails, so they would have no cause to bend. It seems to have worked.

With all the wisdom of hindsight, another approach might have been to remove the wimpy sheet metal support rails and substitute some heavier steel L-channel that wouldn't bend under the weight. I think that the screws might still have pulled out of the particle board (I hate particle board) due to the impact loads on rough roads - but I didn't try it.

So anyway, I am glad there was another working solution, and I look forward to hearing the experience of others who try either fix.

Bill
 
Last edited:
Success!

I had this problem with all three of my TMs. After messing around with several unsuccessful fixes, I identified a number of poor design elements in the oven, the cooktop, the countertop, and the left wall of the TM kitchen cabinet that holds it all. I decided that the needed solution was to support the weight of the oven on the floor, rather than the countertop. By bringing their weight down to the floor, it takes the strain off the countertop, the cabinet left wall, and the metal support strips that are part of the cooktop. The project turned out to be easier than I thought. The picture shows my finished solution on the right hand side of the cabinetry under the oven - it was repeated on the left side.

...

Bill

Thank you for the clear instructions and picture.
I was able to implement an extremely similar fix taking into account the variable cabinet layouts.
I used a variety of L brackets to attach the new pieces to the "bones" of the cabinet. Nothing is attached to the thin veneer or aluminum.

The oven feels secure and is sitting more level than it has in a year. It is also tall enough that I can secure the top plate since it isn't below the height of the counter anymore.

Please excuse the trim sticking out, it is just cosmetic at this point.

I really appreciate all the feedback I got on this matter.

- Carly
 

Attachments

  • 20241222_144532.jpg
    20241222_144532.jpg
    2.6 MB · Views: 92
  • 20241222_153546.jpg
    20241222_153546.jpg
    3.1 MB · Views: 92

Similar threads

Try RV LIFE Pro Free for 7 Days

  • New Ad-Free experience on this RV LIFE Community.
  • Plan the best RV Safe travel with RV LIFE Trip Wizard.
  • Navigate with our RV Safe GPS mobile app.
  • and much more...
Try RV LIFE Pro Today
Back
Top Bottom