Water in large window

Dan33

Senior Member
Joined
Jan 16, 2021
Posts
103
Location
St Louis
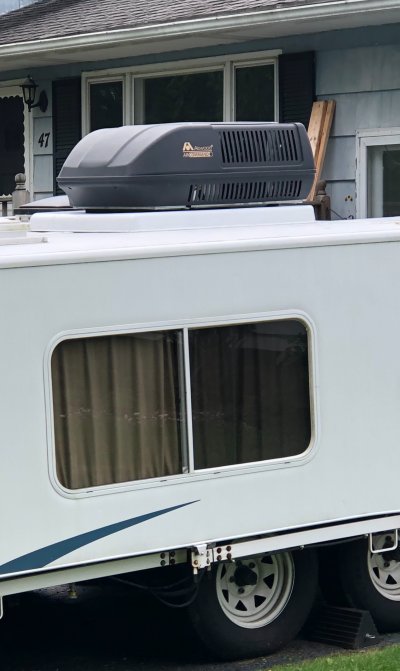
I recently resealed (Dicor) my 2009 2720QB front shell (except for A/C shroud as I ran out of time), but noticed I have water running down my large window (even after sealing) 1 day before departure. Quick solution was to remove old caulking and re caulk the exterior of the window, and I also added a rain gutter. Unfortunately, I still have a steady stream of water down the center of the large window during a rain event this week!

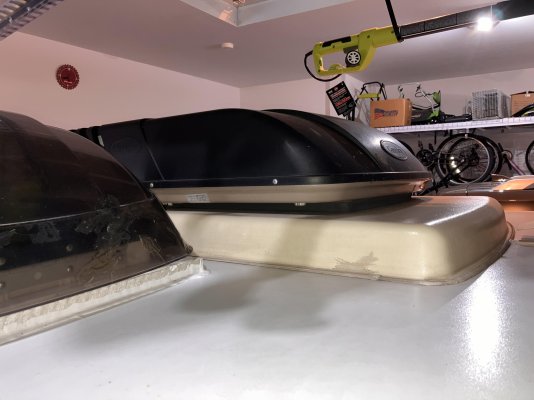
The only entry point I can think of is the A/C shroud (I also have droplets coming in the corner frame of the A/C on inside), traveling laterally and down the window. The luan board has some pop to it so need to get this taken care of ASAP.

Based on info from other posts and members knowledge, this is my plan but appreciate any pointers or experience dealing with this:

1. Remove A/C panel, tighten 4 bolts to 50 inch pounds (4.166 Ft lbs on my torque wrench)
2. Remove caulking and apply Dicor self leveling around A/C riser

If the above 2 steps don't do it, not sure what else would fix. Will update post as I finish key steps.
 

Attachments

  • signal-2024-03-25-211951_004.jpeg
    signal-2024-03-25-211951_004.jpeg
    373.7 KB · Views: 1,226
  • signal-2024-03-25-212124_002.jpeg
    signal-2024-03-25-212124_002.jpeg
    268.2 KB · Views: 1,225
  • signal-2024-03-31-061919_002.jpeg
    signal-2024-03-31-061919_002.jpeg
    249.5 KB · Views: 1,201
  • signal-2024-03-25-211951_002.jpeg
    signal-2024-03-25-211951_002.jpeg
    361.3 KB · Views: 1,232
Last edited:
AC Bolts

Tightened the 4 bolts about 1.5 turns each (torque wrench never clicked and got NO RESISTANCE). Either it was very loose or my torque wrench doesn’t register below 5lb ft. Added before pictures of ac gasket
 

Attachments

  • IMG_5495.jpg
    IMG_5495.jpg
    1.1 MB · Views: 1,156
  • IMG_5524.jpg
    IMG_5524.jpg
    988.6 KB · Views: 1,169
  • IMG_5499.jpg
    IMG_5499.jpg
    1.1 MB · Views: 1,162
Tightened the 4 bolts about 1.5 turns each (torque wrench never clicked and got NO RESISTANCE). Either it was very loose or my torque wrench doesn’t register below 5lb ft. Added before pictures of ac gasket
You never want to put calking between the A/C shroud and the roof riser platform. That will cause your leak to be worse. That will be the sorriest thing you ever did to your camper. You won't be able to even remove the upper shroud without removing all that calking. When you find out that your leak becomes worse, you'll have to remove all that calking. Trust me, do do not want to have to do that.

The only way to stop the water from leaking from the A/C unit into the interior is by either tightening or replacing the gasket between the bottom of the A/C unit and the roof. If that means removing the A/C unit from the roof, that's what you have to do.
 
I think he’s talking about the plastic skirt over the riser. If water is coming in through the foam gasket it would then have to drip off the riser and then find its way into the roof and then travel to the windows.

I had the same torque experience with a brand new gasket, and Inwas using a small 1/4” drive torque wrench. The gasket compressed until the bottom of the A/C was sitting on the lip of the riser skirt and there was never any tension. Backed them off completely and then followed the 1/2 compression rule. No leaks after that. Over-compressing is just as bad as under-compressing that foam seal.
 
You never want to put calking between the A/C shroud and the roof riser platform. That will cause your leak to be worse. That will be the sorriest thing you ever did to your camper. You won't be able to even remove the upper shroud without removing all that calking. When you find out that your leak becomes worse, you'll have to remove all that calking. Trust me, do do not want to have to do that.

The only way to stop the water from leaking from the A/C unit into the interior is by either tightening or replacing the gasket between the bottom of the A/C unit and the roof. If that means removing the A/C unit from the roof, that's what you have to do.

Wavery I’m using the wrong terminology, I’m referring to where the AC meets roof, which was already caulked but thinking it must have a crack somewhere. I’ve added a pic to clarify
 

Attachments

  • IMG_6599.jpeg
    IMG_6599.jpeg
    479.2 KB · Views: 1,181
I think he’s talking about the plastic skirt over the riser. If water is coming in through the foam gasket it would then have to drip off the riser and then find its way into the roof and then travel to the windows.

I had the same torque experience with a brand new gasket, and Inwas using a small 1/4” drive torque wrench. The gasket compressed until the bottom of the A/C was sitting on the lip of the riser skirt and there was never any tension. Backed them off completely and then followed the 1/2 compression rule. No leaks after that. Over-compressing is just as bad as under-compressing that foam seal.

Shane826 you are correct , I meant riser (learning right terms as I go). I’m thinking water is entering between the riser and roof. I’ve added 3 pics after tightening the 4 bolts and I might’ve turned 2-3 times . Maybe I need to back it off .
 

Attachments

  • IMG_6613.jpg
    IMG_6613.jpg
    901.7 KB · Views: 1,190
  • IMG_6614.jpg
    IMG_6614.jpg
    1.1 MB · Views: 1,179
  • IMG_6612.jpg
    IMG_6612.jpg
    931.4 KB · Views: 1,166
First things first, what A/C unit is that?!? It looks like it’s waaaay too far back on the riser with the rear hanging off like that.

As for your leak, simple test is to tape a garden hose on the roof so it’s pointed right at the front of the riser skirt. Open the camper and raise the front end just slightly higher than the rear. Turn on the hose, and watch for leaks. Positioning the hose here eliminates every point of entry possibility except the A/C area.
 

Attachments

  • IMG_1930.jpeg
    IMG_1930.jpeg
    1.7 MB · Views: 1,170
First things first, what A/C unit is that?!? It looks like it’s waaaay too far back on the riser with the rear hanging off like that.

As for your leak, simple test is to tape a garden hose on the roof so it’s pointed right at the front of the riser skirt. Open the camper and raise the front end just slightly higher than the rear. Turn on the hose, and watch for leaks. Positioning the hose here eliminates every point of entry possibility except the A/C area.

Hi Shane826, it is marked as a Carrier Model 68RV14103A (added pic). First TM and RV but definitely looks way further back than yours. Your test sounds like a good way to check if my bolt tightening made things worse before I redo caulking at riser, thanks!
 

Attachments

  • IMG_6649.jpeg
    IMG_6649.jpeg
    213.3 KB · Views: 1,149
I don’t think they used Carrier in 2009 so it’s probably a replacement unit.

Tightening the bolts to compress the foam seal won’t make a bit of difference about a leak at the bottom of the riser skirt since it’s on top of the riser.
 
First things first, what A/C unit is that?!? It looks like it’s waaaay too far back on the riser with the rear hanging off like that.

As for your leak, simple test is to tape a garden hose on the roof so it’s pointed right at the front of the riser skirt. Open the camper and raise the front end just slightly higher than the rear. Turn on the hose, and watch for leaks. Positioning the hose here eliminates every point of entry possibility except the A/C area.

Could the position of the AC be the issue and is this something I can easily move up by removing the 4 bolts? I don’t want to mess around with it and make it worse but wondering if it was installed incorrectly
 
It could be part of the issue as there is a lot more weight hanging over the open end of the shell which could compromise the roof crown. But you can’t just move it… The A/C mounts over a 14”x14” hole on the riser. The only way you could posssibly (and I stress POSSIBLY) change it is to remove the A/C, skirt, and riser; and then rotate the riser 180° so the 14”x14” hole is further towards the front, then reassemble. But that might not even work since you’d also have to rotate the skirt 180° and then it would probably hang off the back edge.

I dunno. I’ve never seen that before.
 
If I understand the construction of the TM shell I believe any water that enters at the compressed gasket would only manifest as dripping from the AC frame and not at window. I barely have a drip there so sounds like I don’t need to mess with repositioning the AC .If that’s the case I think the leak at the window has to be entering between the riser and roof, and the hose test should confirm that. If I have that right will confirm with test then redo the caulking at riser and then only fidget with evenly tightening 4 bolts as needed to address the drip from the ac frame.
 
Thanks, is the compression gasket supposed to cover the entire perimeter between riser and AC? I see a gap with no gasket .Here are some pics of the AC.
 

Attachments

  • IMG_6663.jpeg
    IMG_6663.jpeg
    619.2 KB · Views: 935
  • IMG_6664.jpg
    IMG_6664.jpg
    1.1 MB · Views: 901
  • IMG_6665.jpg
    IMG_6665.jpg
    972.3 KB · Views: 925
No it just surrounds the 14”x14” hole. In fact, see all those foam strips hanging off the back? Those are supposed to act as supports to keep the A/C level on the roof (or in TM’s case on top of the riser).
 
Updates.
1. Ac internal leak stopped so good there with compression gasket
2. Completed dicor sealing all around AC riser (see pics )before hose test
3. Hose test fails :( . Had a real hard time identifying source as it takes quite a bit of water to generate the slow and steady drip at window. Thought it was fan above stove but seems to drip steadily at several places including center seam.

Any ideas where it could be coming from? Next step? I really cleaned well (scrape, mineral spirits, wipe clean , alcohol) before generously applying Self leveling dicor. Hate to remove all risers and center seam after all that but not sure what else to do?
 

Attachments

  • IMG_7189.jpeg
    IMG_7189.jpeg
    248.4 KB · Views: 889
  • IMG_7188.jpeg
    IMG_7188.jpeg
    294.9 KB · Views: 910

Similar threads

Try RV LIFE Pro Free for 7 Days

  • New Ad-Free experience on this RV LIFE Community.
  • Plan the best RV Safe travel with RV LIFE Trip Wizard.
  • Navigate with our RV Safe GPS mobile app.
  • and much more...
Try RV LIFE Pro Today
Back
Top Bottom